- Professional Construction Software Solutions
- 480-705-4241

Arizona Contracting Sales Tax Flow Charts for 2015
March 17, 2015
Bluebeam Tips: Construction Safety Hazards using Pictograms
April 22, 2015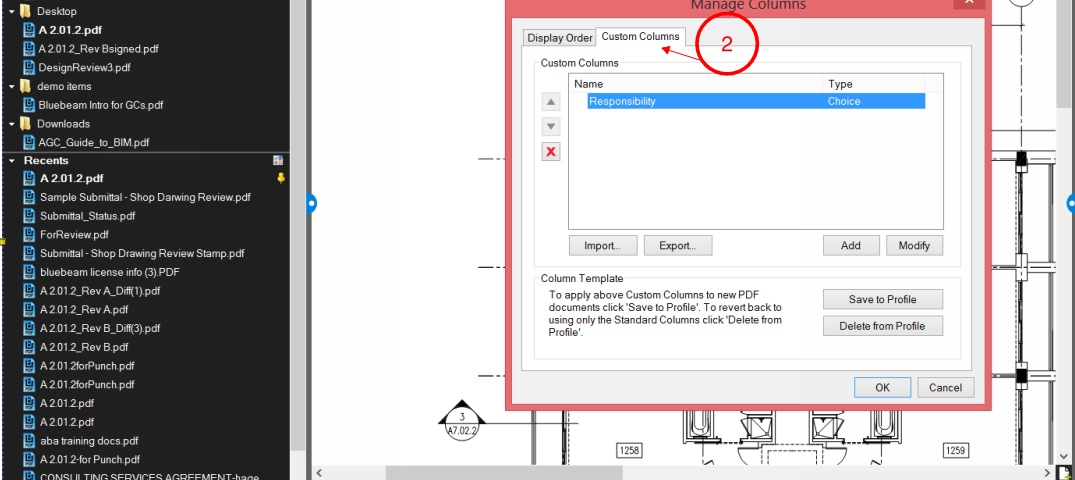
The Punch and Back Check, Design and Constructability Reviews and Estimating Take-off are all top construction workflow that Bluebeam Revu improves for the general contractor and specialty trade alike. Realizing that once you create your own punch symbols (or import those that Bluebeam has available on their website), you”ll want to assign who is responsible for each punch item. The worklist’s Responsibility column in Revu 2015 is set as a text column. This leaves the column blank and you must fill in each item manually. If you’d rather a dropdown list to choose from it just takes a few minutes to create.
How to add a Responsibility column with a Choice to your Markup Work list:
You must have a PDF document open to proceed. Choose which profile you want to add the custom Responsibility column to or
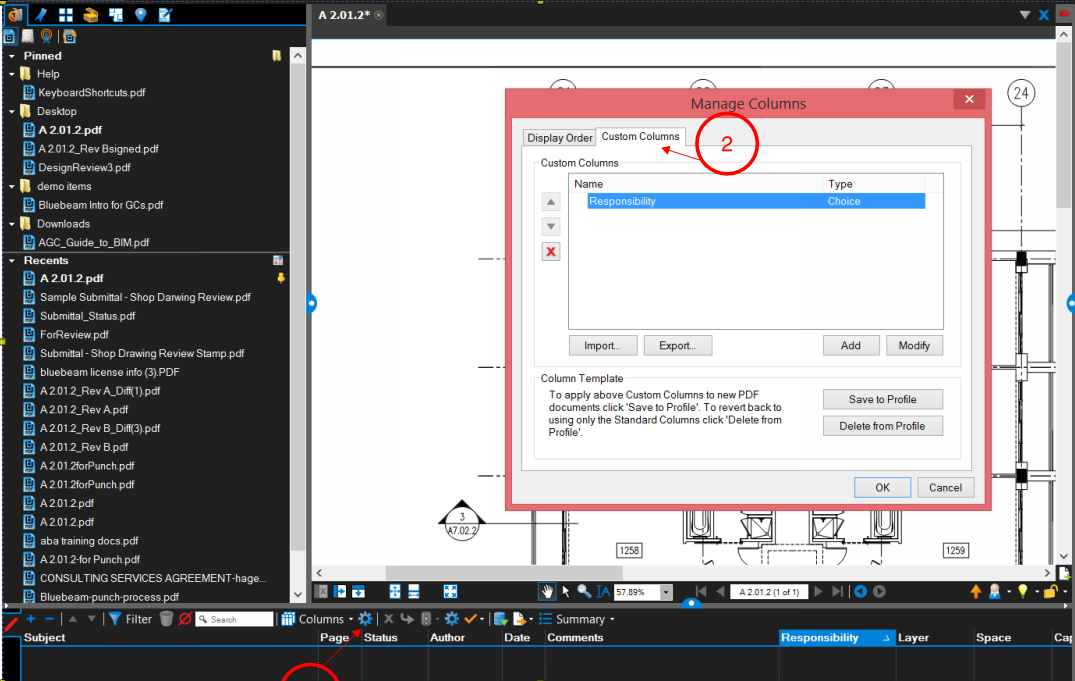
1. In the worklist, click on the gear next to Columns to Manage Columns.
2. Choose the Custom tab and select Add if the Responsibility column isn’t already there..
Enter “Responsibility” as the Name and pick “Choice” from the dropdown (otherwise choose “Modify” and change the Responsibility Column’s Type to “Choice”).
3. In the Item field, enter the name of who will be responsible. This typically is either a person’s name or a company name.
4. In the Subject field, enter the subject for the item. This links to the Subject property of a markup, allowing for selective filtering of the list based on the markup.
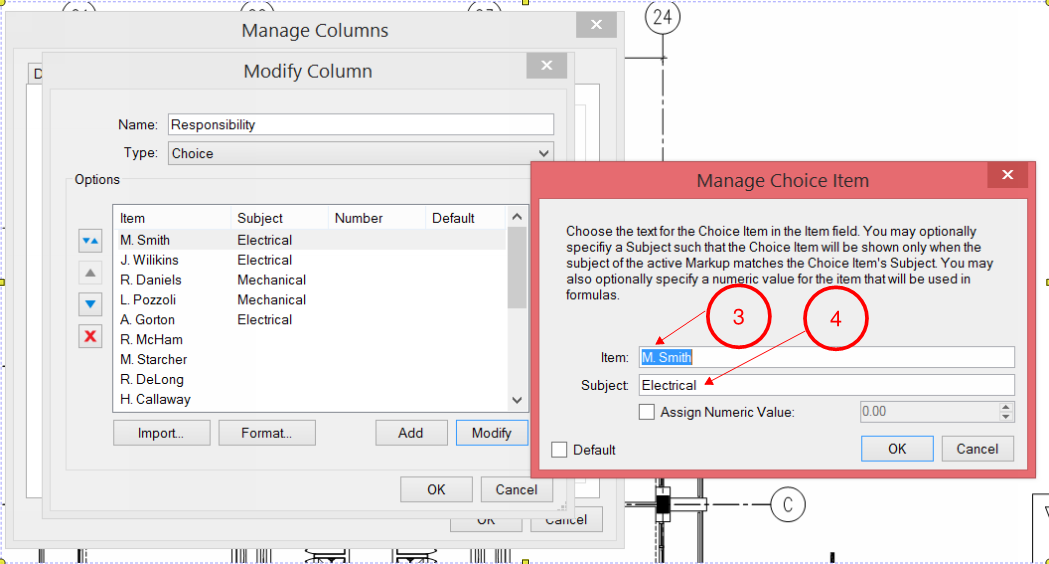
Note 1: The Subject of the Markup must match the Item’s Subject exactly for it to appear as a selection in the markup’s Responsibility dropdown choices (i.e. it is case sensitive). If you do not include a Subject for an Item, it will be available to use on all markups regardless of the subject.
Note 2: If you want to also have the option to enter a name not listed in the dropdown choices, click on Format while in the Add Column or Modify Column dialogue box and check the box for “Allow Custom Text”.
Note 3: Many Bluebeamers have custom profiles for each project as the Responsibility list may be job specific. A responsibility column is also handy for Design and Constructability Reviews.
Note 4: If you want certain custom columns, custom tool sets and toolbars available in Studio Sessions, they are stored in the document (or **Saved in a Profile). Make your changes to your worklist columns, etc with the document opened that you plan to upload to Studio. Save the document after you have made your customizations, then upload it to Studio.
Note 5: If you have 10+ Subjects or Responsibility Items (names) to add, it may be quicker to create a file and use the Import Option in the Modify Columns dialogue box.
Creating a Responsibility List to Import
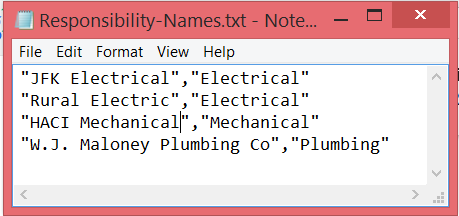
This begins with a CSV file. You can create a CSV file even without Excel by just using NotePad using these steps:
1. Access Notepad click on Start | All Programs | Accessories | NotePad or if using Windows 8+ use the Charms feature and search for “NotePad”
2. Using the format “Item”,”Subject” type in one choice per line with each component in “quotes” and separated by a comma as shown here:
3. Once you’ve added all your entries, Click File | Save as and name it ResponsibilityList.TXT (save it as a .TXT file on your desktop).
4. Use Steps 1 and 2 from the “How to add a Responsibility code to your Markups List” above and select Import.
Note: The Import option will replace an already existing list of Items in your custom column for the document you have open.
If you **save it to a profile it is changing the list for all documents using this profile moving forward.
**Check with your network administrator before saving to a profile as your company’s profiles may be on a shared drive and impact all other Bluebeam Revu users.
If you’d like to hire me to create Custom Profiles, Toolbars and Tool Sets for your firm, please Email Me Your Contact Info.


2 Comments
[…] Bluebeam Tip: Adding a Responsibility Column with a Choice to your Worklist […]
[…] To read the original article (CLICK HERE). […]